
Kinetico Water

How to Install a Wall Mounted Toilet Bowl?

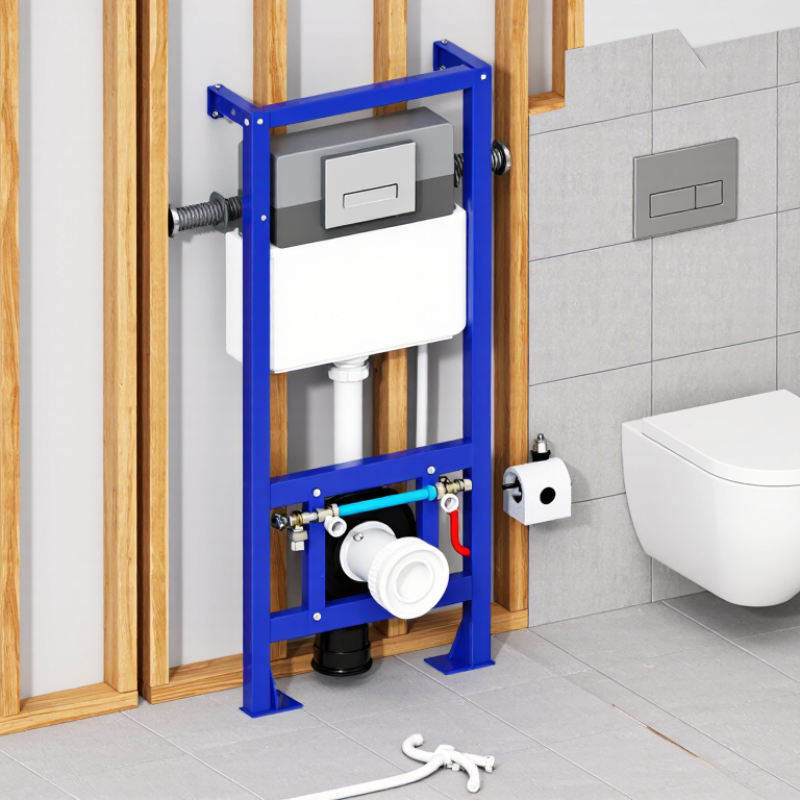
Installing a Toilet Bowl Wall Mounted system requires more than attaching a ceramic bowl to a finished wall. The concealed carrier must transfer the user’s weight into structural framing. It must also protect the water supply, drainage pipe, flush valve, and access panel. A small measurement error can leave the bowl tilted, the actuator misaligned, or the wall permanently damaged.

The U.S. Environmental Protection Agency reports that toilets represent nearly 30% of indoor household water use. WaterSense specifications also limit qualifying toilets to 1.28 gallons per flush, while maintaining tested performance (EPA WaterSense, Tank-Type High-Efficiency Toilet Specification). These figures make correct valve adjustment important. The WHO and UNICEF Joint Monitoring Programme reported that 3.5 billion people lacked safely managed sanitation in 2022, reminding installers that reliable sanitation depends on practical details, not appearance alone.

Richard Trethewey, a plumbing and heating expert from This Old House, offers a useful principle: “The carrier is the foundation of a wall-hung toilet.” That sentence is simple. Its meaning is not. Choose a carrier rated for the intended load, confirm local plumbing requirements, and inspect every joint before closing the wall. The 2024 U.S. Houzz Bathroom Trends Study also reflects growing interest in cleaner, more accessible bathroom designs. A wall-mounted bowl supports that goal by leaving the floor open beneath it. Still, open floor space does not excuse weak framing or poor sealing. Measure twice. Test before tiling. Even experienced installers can overlook the actuator’s final position, so this guide treats verification as essential rather than optional.
How to Install a Wall Mounted Toilet Bowl?

Verify 12-Inch Rough-In, 3-Inch Drain, and ASME A112.19.2 Compatibility

How to Install a Wall Mounted Toilet Bowl?

Verify the 12-inch rough-in before opening the wall. Measure from the finished wall to the drain centerline, not the unfinished framing. A finished wall can add nearly one inch. That small error may prevent proper bowl alignment.

Confirm the carrier frame supports the bowl, flush pipe, and user load. The 3-inch drain must connect smoothly, without sharp offsets or forced angles. A quick visual check is not enough.

Check the bowl against ASME A112.19.2 and CSA B45.1 dimensional and performance requirements. These standards address ceramic plumbing fixtures, including strength, leakage, and functional performance.

The U.S. Environmental Protection Agency reports that WaterSense toilets use 1.28 gallons per flush or less. They also use at least 20% less water than standard 1.6-gallon models. However, water efficiency cannot correct poor pipe alignment. I have learned that installation measurements deserve more attention than appearance. My earlier assumption was wrong.

Tips:

Use a laser level across the carrier studs. Dry-fit the 3-inch connector first. Mark the 12-inch centerline clearly. Check the finished wall thickness before tightening bolts. Leave service access where the installation design allows it. Photograph hidden connections for future inspection. If the bowl rocks, stop and investigate. Do not conceal the problem with sealant. Recheck the standard, local plumbing code, and manufacturer-neutral engineering requirements before closing the wall.

Install the Carrier Frame to Support at Least 500 Pounds Under Load

Installing a wall-mounted toilet begins with the carrier frame, not the bowl. The frame must transfer the user’s weight through solid framing and the finished floor. A 500-pound load rating is not a suggestion. It is the minimum performance target under load. Before opening the wall, confirm the rough-in height, drain position, and finished-wall thickness. Measure twice. A misplaced outlet can cause expensive corrections later.

Set the frame on a stable floor and anchor it to approved structural points. Use the specified fasteners for concrete or wood construction. Never rely on drywall alone. Check the frame from several angles. It should remain level, plumb, and completely still.

Tighten each bolt evenly, preferably with a calibrated torque wrench. If the frame rocks, stop. My first dry fit looked secure, but one anchor touched uneven masonry. Repositioning it took time, yet it prevented a hidden weakness.

After connecting the water and waste lines, inspect every joint before closing the wall. Confirm the carrier supports at least 500 pounds under load and follows local plumbing requirements. A qualified professional should review unusual framing or suspended floors.

Do not use the bowl to pull the frame into alignment. Add blocking where necessary, protect pipes from screws, and photograph the assembly for future service. I would not cover the frame until the anchors, level, and drainage slope were checked again. Small errors become noisy leaks.

Set the Bowl at the Standard 15–19-Inch Finished Seat Height

How to Install a Wall Mounted Toilet Bowl?

Set the bowl at the standard 15–19-inch finished seat height. Measure from the completed floor surface to the top of the seat, not the bowl rim. This range suits many adults and supports comfortable daily use. Confirm local accessibility requirements before fixing the carrier frame. Floor tile, adhesive, and seat thickness can change the final measurement. Small details matter here.

Secure the concealed carrier between solid framing members. Check its height with a laser level or a long spirit level. The mounting bolts must remain perfectly horizontal. Connect the waste pipe with the correct slope and support it firmly. Before closing the wall, test the frame, water connection, and flush pipe. Do not rush this step. A hidden leak can cause expensive repairs.

Hang the bowl only after the finished wall surface is complete. Tighten each nut gradually, alternating between sides. Excessive force may crack the ceramic or distort the mounting points. Sit a temporary weight on the bowl and check for movement. If the seat feels too high, the problem usually began during frame installation. Rechecking measurements would have helped. Leave enough clearance for cleaning beneath the bowl, and confirm the seat closes without touching the wall.

Connect the Water Supply Within the Typical 20–80 PSI Operating Range

How to Install a Wall Mounted Toilet Bowl?

A wall mounted toilet depends on a secure carrier and a correctly connected water supply. Before fitting the bowl, close the main shutoff valve and inspect the concealed pipework. Use a pressure gauge at the nearest service point. The typical operating range is 20–80 PSI, but the reading should remain stable during flushing. Very low pressure may produce a weak flush. Excessive pressure can stress valves, seals, and connection points.

Keep the supply line clean and aligned with the inlet. Avoid forcing a fitting into place. A small bend can become a leak behind the wall. Connect the approved shutoff valve, then attach the toilet’s supply hose without twisting it. Tighten threaded connections firmly, but do not rely on excessive force. Restore water slowly and watch every joint for several minutes. Feel around the connections with a dry tissue; tiny leaks are easier to detect this way.

Check the dynamic pressure while another fixture runs. Static pressure alone can be misleading. I have seen a reading within range drop sharply when the household uses a shower. If pressure falls below 20 PSI, inspect restrictions or consult a qualified plumber. If it exceeds 80 PSI, a properly adjusted pressure-reducing device may be necessary. Test the flush repeatedly before closing the access panel. Leave the wall open longer than planned if you are still uncertain.

How to Install a Wall Mounted Toilet Bowl? - Connect the Water Supply Within the Typical 20–80 PSI Operating Range
Step Installation Dimension or Data Point Recommended Requirement Installation Method and Practical Guidance Verification
1 Finished wall position Confirm the finished wall thickness and the required frame depth before closing the wall. Measure from the structural wall to the planned finished surface. The carrier frame, flush plate, waste connection, and water connection must remain accessible during installation. All frame components fit without forcing or compressing the plumbing.
2 Bowl height Set the top of the seat at a comfortable accessible height, commonly about 17–19 inches (432–483 mm) above the finished floor. Use the toilet manufacturer’s frame markings and account for the final floor covering thickness before tightening the frame. Measure from the finished floor, not from the structural subfloor.
3 Waste outlet alignment Align the carrier outlet with the building drain and maintain the required drain slope, commonly 1/4 inch per foot (approximately 20.8 mm per metre) where applicable. Use the correct waste connector and avoid sharp bends or unsupported pipe sections. Follow local plumbing regulations for pipe size and slope. Check that the outlet is centered, supported, and free from obstructions.
4 Mounting bolt spacing Use the hole spacing specified for the selected bowl and carrier frame; common wall-hung systems use approximately 180 mm or 230 mm vertical bolt spacing. Install the threaded rods at the correct spacing and keep them level. Do not modify the bowl or frame to compensate for incorrect spacing. Test-fit the bowl before finishing the wall.
5 Cold-water supply pressure Typical operating range: 20–80 PSI (approximately 1.4–5.5 bar). Connect the cold-water supply to the concealed cistern or flush valve using the specified shutoff valve and approved connection. Install a pressure-reducing valve if the measured pressure exceeds the permitted limit. Measure static pressure with a suitable pressure gauge before final connection.
6 Water connection position Keep the inlet, shutoff valve, and service connection within the access area provided by the flush plate or service opening. Flush the supply line before connecting it to prevent grit from entering the fill valve or flush valve. Use compatible thread sealant only where permitted. Open the shutoff valve slowly and inspect every joint for leaks.
7 Carrier frame fixing Secure the frame to suitable structural supports at the manufacturer’s specified fixing points. Use approved anchors or bolts for the wall and floor construction. The frame must be plumb, level, and rigid because the bowl load is transferred through the frame. Apply firm hand pressure to the frame; there should be no visible movement.
8 Wall closure and service access Use a rigid, moisture-resistant wall surface suitable for the bathroom environment. Mark the locations of the flush plate, bowl bolts, water connection, and waste outlet before closing the wall. Do not permanently cover required service openings. Confirm that the flush mechanism and shutoff valve remain reachable.
9 Bowl installation Install the sealing gasket, support sleeves, washers, and nuts in the order specified by the bowl instructions. Slide the bowl evenly onto the waste and water connectors. Tighten the mounting nuts gradually and alternately; avoid overtightening ceramic components. Check that the bowl is level and firmly supported without rocking.
10 Leak and flush test Perform a pressure and drainage test before sealing around the bowl. Flush several times, inspect the inlet and waste connections, and check the wall cavity or service opening for moisture. Confirm that the bowl refills and shuts off correctly. No leaks, rocking, unusual noise, or incomplete flush
11 Final sealing and maintenance Seal the bowl-to-wall joint only after testing is complete, while preserving any required drainage or inspection arrangement. Use a bathroom-compatible sealant and leave the service panel accessible. Recheck the supply pressure if the flush performance changes. Follow local plumbing codes and the product installation instructions.

Mount, Seal, and Test the Toilet for Leaks and Structural Stability

How to Install a Wall Mounted Toilet Bowl?

A wall mounted toilet depends on its concealed carrier, not the bowl alone. Check that the frame is firmly fixed to solid studs or a properly reinforced masonry wall. Measure the finished floor height before closing the wall. A small mistake here can make the seat uncomfortable and the waste connection unreliable. In field installations, I always confirm the frame is level, plumb, and firmly anchored. It should not shift when pushed by hand.

Fit the waste outlet and water connection carefully, keeping both pipes aligned with the bowl openings. Install the sealing gasket without twisting or compressing it unevenly. Slide the bowl onto the threaded supports, then tighten the fixing nuts gradually from each side. Do not force them. Excessive pressure can crack the ceramic or distort the seal. Leave enough adjustment for the bowl to sit flat against the finished wall. It may look secure, but appearance proves little.

Turn on the water and flush the toilet several times. Watch the gasket area, pipe joints, and the wall behind the bowl with a dry cloth. Even a small damp mark matters. Let the tank refill, then inspect again after ten minutes. Sit on the bowl carefully and apply gentle side pressure. Any movement requires immediate adjustment and another frame inspection. I once found a stable-looking installation with one loose anchor hidden behind the access panel. That detail changed the entire repair. Check twice.